Posts

Showing posts from June, 2013

Adding Menu's, Sub-Menus and Menu Separator at Design Time in Visual Basic 6
Image
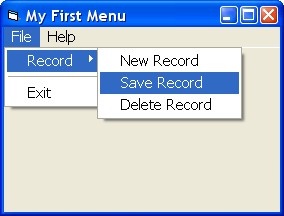
This is a quick guide for beginners on how to add Menu, Sub-Menu and Menu Separator at Design Time in VB6 Project. To do this, Open up your Microsoft Visual Basic and start a New Standard EXE Project that will automatically create a form named Form1. Just follow the steps below or download the example here . 1.) First, right click on form then choose Menu Editor or Press Ctrl+E . 2.) On the Menu Editor, add a Main Menu Caption like "File" and give it a name like "nFile" then click Next. 3.) Click the right arrow button to add a menu under the main menu "File". 4.) Now create the First Level Menu and give it a Caption like "Record" and a name like "mRecord". 5.) Now to create a Sub-Menu for the menu Record, click the next button and the arrow button. As you can see in the list below that it is nested. Note: You can use the arrows to move your menus up, down, left or right. 6.) Now to create the Menu Separator , j...

How to Move a Border-less Form or Control in VB6/Visual Basic 6

Image
The following codes allows you to drag or move a border-less Form or Control in Visual Basic 6. This also works on other controls like Label , Image or Picture Box . You can also move or drag a control inside a form. Copy and Paste the code below in a Standard Module. Declare Function SendMessage Lib "user32" Alias "SendMessageA" (ByVal hWnd As Long, ByVal wMsg As Long, ByVal wParam As Long, lParam As Any) As Long Declare Sub ReleaseCapture Lib "user32" () Public Const WM_NCLBUTTONDOWN = &HA1 Public Const HTCAPTION = 2 Then Copy and Paste the code below on a Form or Controls MouseDown Event. Private Sub Form_MouseDown(Button As Integer, Shift As Integer, x As Single, y As Single) Dim ReturnValue As Long If Button = 1 Then Call ReleaseCapture ReturnValue = SendMessage(Me.hWnd, WM_NCLBUTTONDOWN, HTCAPTION, 0&) End If End Sub You should be able to move the form by holding the mouse button...

Prevent Autorun.inf Virus from running in your Computer

Image
Autorun.inf is mostly used by hackers to run and spread malicious software or malwares and viruses in computers. Most people especially those who are not so familiar with this type of file are victimized. In my own experience when I was surfing the net in an Internet Cafe and plugged in my USB Drive to the PC I was using. I was there to do some research and surfing other stuffs without any problem. Later on when I went home and plugged in my USB Drive into my PC I've noticed that all folder's and documents on my USB were all gone but found out that those was just hidden. And when I was able to retrieve back all files and documents I've noticed this " Autorun.inf " folder in my USB. I tried to delete the folder but failed because it's having a read-only attribute. So here's what I did: 1.) Open " Run ", type in " cmd ". To open the command prompt window. 2.) In the Command Prompt window, type in the Drive letter of the USB rem...

Tricks on how to set an image background of folders in Windows XP/Vista/7

Image
Have you ever wanted to customize the background of any folders in Windows XP/Vista/7? This trick will allow you to add a custom image background on your personal folders. 1.) Choose the folder you want to customize. 2.) Save the image you want to set as background in the folder. Or you may also use the image file in a specific location. 3.) Open "Notepad" and paste the code below then save as "desktop.ini" inside the folder.     [{BE098140-A513-11D0-A3A4-00C04FD706EC}]     iconarea_image=Mustang-Monster-HD-Wallpapers.jpg     iconarea_text=3407871 *Note: Make sure you type the exact location of the image file. If you save the image inside the folder then just type the filename and the exact image extension. 4.) Open " Run " and type " cmd ". 5.) Now, we're gonna set the system file attribute of the folder we want to customize.     On the command prompt window, type attrib +s "< folder ad...

Excel VLOOKUP Function Tutorial

Image
The following example will give you an idea on how to use VLOOKUP in Microsoft Excel. If you're working with an excel database and want it to be dynamic the VLOOKUP/HLOOKUP functions are very useful for you. The VLOOKUP function looks up value in columns while HLOOKUP does in rows.  This example has two sheets "Price_List" and "Orders" for mobile brands. *Note: The values given are not the actual market prices. The "Price_List" sheet has three columns ID, Model and Price. This is where we'll be looking up the prices value for every orders made. Now, on the orders tab we have 3 orders made. We'll add the VLOOKUP function in the Total Price formula. This formula "=VLOOKUP(B2,Price_List!B1:C7,2,FALSE)" will LOOKUP for the price of the unit brand in the Price_List Sheet. =IF(C2<>"",VLOOKUP(B2,Price_List!B1:C7,2,FALSE) *C2,VLOOKUP(B2,Price_List!B1:C7,2,FALSE)) The formula above is a  logical cond...

Keyascii Code Generator in VB6

Image
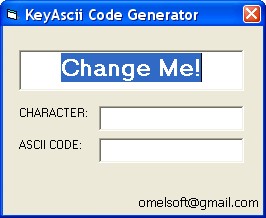
This application allows you get the equivalent KeyAscii Value for every key you'll press on your keyboard. Just click on the "Change Me!" and start pressing any key on your keyboard. The Character Box will display the key you just pressed. And the ASCII Code box will display the keyascii value of the key you pressed. Download the KeyAscii Code Generator sample program.