How to Add an Adsense Code Manually into Blogger Template
In this article you'll be able to learn on how to Add an AdSense Code manually into blogger template. If you have an AdSense Account and wanted to setup a blog using blogger. You can however incorporate your approved email account with AdSense in which blogger creates the widget and automatically insert your adcode in between, before or after each posts.
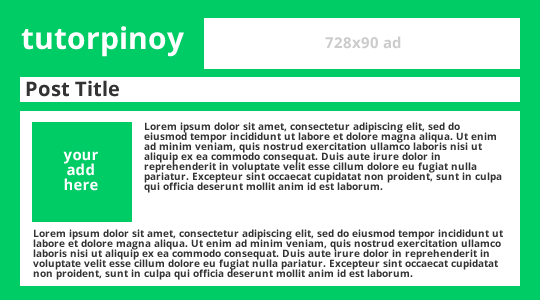
You can find anywhere in the web on how to do this thing but here I'm going to give you the instructionswith ease. Let's take a look at the layout below.
What we're going to do is put an AdSense code in the green square with "your add here" caption. And we only wanted it to appear on items and or blog posts.
1 On your Blogger's dashboard, Click the Template then Click "Edit HTML".
2 Click anywhere on the Template editor window and Press Ctrl+F then type the following b:widget id='Blog1' in the search box and press Enter. You should see similar to the image below. Within the Blog1 widget you should see the elements (includable) of the widget such as main, backlinks, post and etc which is determined by the id attribute.
3 We're going to create another element with an attribute id adItemThumb just after the main element as you can see below. As you can also see, you can replace the AdSense Code with your own. And another thing to consider and take a closer look is the async attribute of the script tag. You should set the value to true, async='true' or otherwise you'll got an XML parsing error.
4 Once you have created the adItemThumb element, you can already include it in anywhere in the blog widget.
In this tutorial, we'll put the AdSense code within our post to make it look like a featured image of the post.
5 Now, find the following line in the template "post-body entry-content". In the following code, we added a simple condition which means if the page is an item then we add the element contents of the adItemThumb inside the div tag with an attribute id "ad".
6 To finally make it to work we would need an additional CSS tweak to be added. On the header style section, add the following CSS codes.
7 Finally, save the template and preview an item on your blog.
You can find anywhere in the web on how to do this thing but here I'm going to give you the instructionswith ease. Let's take a look at the layout below.
What we're going to do is put an AdSense code in the green square with "your add here" caption. And we only wanted it to appear on items and or blog posts.
1 On your Blogger's dashboard, Click the Template then Click "Edit HTML".
2 Click anywhere on the Template editor window and Press Ctrl+F then type the following b:widget id='Blog1' in the search box and press Enter. You should see similar to the image below. Within the Blog1 widget you should see the elements (includable) of the widget such as main, backlinks, post and etc which is determined by the id attribute.
4 Once you have created the adItemThumb element, you can already include it in anywhere in the blog widget.
In this tutorial, we'll put the AdSense code within our post to make it look like a featured image of the post.
5 Now, find the following line in the template "post-body entry-content". In the following code, we added a simple condition which means if the page is an item then we add the element contents of the adItemThumb inside the div tag with an attribute id "ad".
6 To finally make it to work we would need an additional CSS tweak to be added. On the header style section, add the following CSS codes.
#ad {
 width:336px;
 height: 280px;
 float: left;
 display: block;
 margin-right: 10px;
}
7 Finally, save the template and preview an item on your blog.


This comment has been removed by the author.
ReplyDeleteThis comment has been removed by a blog administrator.
ReplyDelete