Posts

Showing posts from April, 2014

How to Suppress Warning and Alerts in Excel using VBA

Image
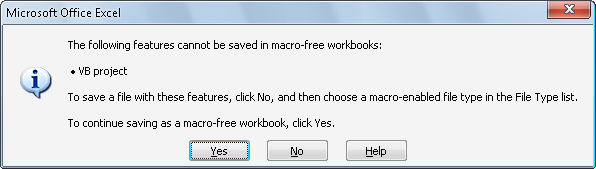
In Microsoft Excel, you can suppress the message warning and alerts especially when you try to create a copy of a worksheet from a workbook containing macros to a new workbook which you wanted to save it as .xls or .xlsx extensions. By that, when you save the document it will prompt you to whether save the work as macro-enabled or macro-free workbook. You can do that by setting DisplayAlerts to False with VBA code. Application.DisplayAlerts = False 'DO SOME TASKS HERE Application.DisplayAlerts = True

How to Create a Custom Checkbox using only the Cells in Microsoft Excel

Image
You might be creating templates with Microsoft Excel, and one of the feature you want is add a check boxes control where users can choose their option.  We'll, if you want to have another look aside from the default check box control. You can still create and customize your check box controls with a little VBA code to get it done. In this example, I have here choices for the reason of a leave application form. I make use of the Microsoft Excel's Cell as a check box. It's just a matter of resizing the rows and columns to make the size of the cell equal.  1.)  Now, let's create first the list of choices, as you can see below I've resized the cells and add borders on the cells which we'll set as a check-cell box control. 2.)  Right Click on the Worksheet, then Click " View Code ". 3.)  Then Copy and Paste the following codes below into the code editor window. The following code will set the Target Range of when the Check-Cell box will be

Load Data of DataGridView's Selected Row to TextBox Control in C#/CSharp

Image
The following example loads the data of the Selected Row in a DataGridView control into a TextBox control in CSharp. As shown on the previous example  Populate Data Into DataGridView using For-Loop in C#/CSharp , we'll use that method to fill our DataGridView with data. To begin with: 1.) Start start a new C# project. 2.) Add the following controls onto Form1. (1) DataGridView Control (2) TextBoxes (2) Labels 3.) Open the Windows Form Designer and Update the DataGridView's generated code with the following. // // dataGridView1 // this.dataGridView1.ColumnHeadersHeightSizeMode = System.Windows.Forms.DataGridViewColumnHeadersHeightSizeMode.AutoSize; this.dataGridView1.Location = new System.Drawing.Point(12, 12); this.dataGridView1.Name = "dataGridView1"; this.dataGridView1.Size = new System.Drawing.Size(240, 221); this.dataGridView1.TabIndex = 0; this.dataGridView1.CellClick += new System.Windows.Forms.DataGridViewCellEventHandler(this.dataGridView1_CellC

Populate Data Into DataGridView using For-Loop in C#/CSharp

Image
The following example will populate data into a DataGridView Control using For-Loop. To begin with: 1.) Create a new C# Project. 2.) Add a DataGridView Control onto Form1. 3.) Then copy the code below and paste on Form1_Load() event. Random rand = new Random(); DataGridView dgv = this.dataGridView1; //DATAGRIDVIEW SETTING dgv.AllowUserToAddRows = false; dgv.RowHeadersVisible = false; dgv.SelectionMode = DataGridViewSelectionMode.FullRowSelect; //ADD COLUMN HEADERS dgv.Columns.Add("Product", "Product"); dgv.Columns.Add("Price", "Price"); //ADD 10 ROWS dgv.Rows.Add(10); //NOW, POPULATE THE DATA INTO THE CELLS for (int i = 0; i < 10; i++) {     double price = rand.Next(1, 30) * rand.NextDouble();     dgv.Rows[i].Cells[0].Value = "Product " + i;     dgv.Rows[i].Cells[1].Value = "$ " + price; } //CLEARS THE DEFAULT SELECTION WHICH IS THE FIRST ROW dgv.ClearSelection(); 4.) Build and Comp