Posts

Showing posts with the label VISUAL BASIC

How to Minimize/Send an App Icon to System Tray in Visual Basic 6

The following code snippet allows to manipulate the system tray by adding your apps icon when you minimize the form and restore when you double click on the app's icon on the system tray area. Option Explicit Public Type NOTIFYICONDATA cbSize As Long hWnd As Long uId As Long uFlags As Long uCallBackMessage As Long hIcon As Long szTip As String * 64 End Type Public Const NIM_ADD = &H0 Public Const NIM_MODIFY = &H1 Public Const NIM_DELETE = &H2 Public Const WM_MOUSEMOVE = &H200 Public Const NIF_MESSAGE = &H1 Public Const NIF_ICON = &H2 Public Const NIF_TIP = &H4 Public Const WM_LBUTTONDBLCLK = &H203 'Double-click Public Const WM_LBUTTONDOWN = &H201 'Button down Public Const WM_LBUTTONUP = &H202 'Button up Public Const WM_RBUTTONDBLCLK = &H206 'Double-click Public Const WM_RBUTTONDOWN = &H204 'Button down Public Const WM_RBUTTONUP = &H205 'Button up Public Declare Function Shel...

How to Set Windows Form Always on Top of Other Applications in VB6

The following code snippets allows to set Windows Form Always on Top of Other applications in Visual Basic 6.0. Public Const SWP_NOMOVE = 2 Public Const SWP_NOSIZE = 1 Public Const FLAGS = SWP_NOMOVE Or SWP_NOSIZE Public Const HWND_TOPMOST = -1 Public Const HWND_NOTOPMOST = -2 Declare Function SetWindowPos Lib "user32" _ (ByVal hWnd As Long, _ ByVal hWndInsertAfter As Long, _ ByVal x As Long, _ ByVal y As Long, _ ByVal cx As Long, _ ByVal cy As Long, _ ByVal wFlags As Long) As Long The following SetTopMostWindow() function takes two parameters as follows:       hWnd : the window handle       Topmost : It is either True to set the on top or False if Not. Public Function SetTopMostWindow(hWnd As Long, Topmost As Boolean) As Long If Topmost = True Then 'Make the window topmost SetTopMostWindow = SetWindowPos(hWnd, HWND_TOPMOST, 0, 0, 0, 0, FLAGS) Else SetTopMostWindow = SetWindowPos(hW...

How to Make Windows Form Transparent using Visual Basic 6/VB6

The following code snippets allows you to make windows form transparent using VB6. In a standard module, copy and paste the following declarations and function. [ Module1.bas ] Option Explicit Const LWA_COLORKEY = 1 Const LWA_ALPHA = 2 Const LWA_BOTH = 3 Const WS_EX_LAYERED = &H80000 Const GWL_EXSTYLE = -20 Private Declare Function SetLayeredWindowAttributes Lib "user32" (ByVal hWnd As Long, ByVal color As Long, ByVal x As Byte, ByVal alpha As Long) As Boolean Private Declare Function SetWindowLong Lib "user32" Alias "SetWindowLongA" (ByVal hWnd As Long, ByVal nIndex As Long, ByVal dwNewLong As Long) As Long Private Declare Function GetWindowLong Lib "user32" Alias "GetWindowLongA" (ByVal hWnd As Long, ByVal nIndex As Long) As Long Private Declare Function WindowFromPoint Lib "user32" (ByVal xPoint As Long, ByVal yPoint As Long) As Long Private Declare Function GetCursorPos Lib "user32" (lpPoint As POINTAP...

How to Create a Configuration.INI Files in VB6

Image
In this example shows only a simple form that saves and retrieves value from the CONFIG.INI file. After reading this, you can use your own creativity on how you're going to implement this on your project. To start with, On your Form add the following controls and arrange them according to the image above. (1) TextBox - Change the Name property to "txtSetting" (2) Command Button - Change the Caption and Name Properties to the following:                                        Save:          Change the Name property to "cmdSave"                                        Retrieve:    Change the Name property to "cmdRetrieve" (5) Label - For the two labels we'll be using to retrieve the values. Remove the default caption and change...

Adding Menu's, Sub-Menus and Menu Separator at Design Time in Visual Basic 6

Image
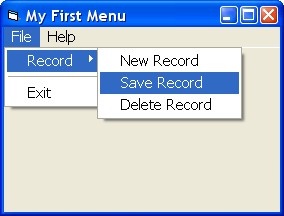
This is a quick guide for beginners on how to add Menu, Sub-Menu and Menu Separator at Design Time in VB6 Project. To do this, Open up your Microsoft Visual Basic and start a New Standard EXE Project that will automatically create a form named Form1. Just follow the steps below or download the example here . 1.) First, right click on form then choose Menu Editor or Press Ctrl+E . 2.) On the Menu Editor, add a Main Menu Caption like "File" and give it a name like "nFile" then click Next. 3.) Click the right arrow button to add a menu under the main menu "File". 4.) Now create the First Level Menu and give it a Caption like "Record" and a name like "mRecord". 5.) Now to create a Sub-Menu for the menu Record, click the next button and the arrow button. As you can see in the list below that it is nested. Note: You can use the arrows to move your menus up, down, left or right. 6.) Now to create the Menu Separator , j...

How to Move a Border-less Form or Control in VB6/Visual Basic 6

Image
The following codes allows you to drag or move a border-less Form or Control in Visual Basic 6. This also works on other controls like Label , Image or Picture Box . You can also move or drag a control inside a form. Copy and Paste the code below in a Standard Module. Declare Function SendMessage Lib "user32" Alias "SendMessageA" (ByVal hWnd As Long, ByVal wMsg As Long, ByVal wParam As Long, lParam As Any) As Long Declare Sub ReleaseCapture Lib "user32" () Public Const WM_NCLBUTTONDOWN = &HA1 Public Const HTCAPTION = 2 Then Copy and Paste the code below on a Form or Controls MouseDown Event. Private Sub Form_MouseDown(Button As Integer, Shift As Integer, x As Single, y As Single) Dim ReturnValue As Long If Button = 1 Then Call ReleaseCapture ReturnValue = SendMessage(Me.hWnd, WM_NCLBUTTONDOWN, HTCAPTION, 0&) End If End Sub You should be able to move the form by holding the mouse button...

Keyascii Code Generator in VB6

Image
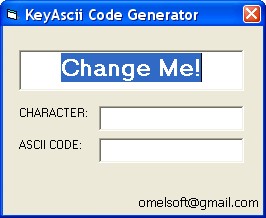
This application allows you get the equivalent KeyAscii Value for every key you'll press on your keyboard. Just click on the "Change Me!" and start pressing any key on your keyboard. The Character Box will display the key you just pressed. And the ASCII Code box will display the keyascii value of the key you pressed. Download the KeyAscii Code Generator sample program.

How to enable Mouse Wheel Scrolling in VB6

Image
This article will guide you through on how to enable Mouse Wheel Scrolling in VB6 . 1. You need to download the Microsoft's VB6 Mouse Wheel Addin . 2. Run the Self-Cabinet Extractor and Unzip the necessary files.    You may change the destination to accessible location "C:\vb6mwfix". 3. Open " Run ", copy and paste this code " xcopy C:\vb6mwfix\VB6IDEMouseWheelAddin.dll %windir%\system32\VB6IDEMouseWheelAddin.dll " without " qoutes ". 4. Press " F " to confirm the destination as file. 5. Open " Run ", copy and paste this code " regsvr32 %windir%\system32\VB6IDEMouseWheelAddin.dll " without " qoutes " to register the add-in. 6. Open the "VBA Mouse Wheel Fix.reg " located on the folder where you extract the files to add the addin information in the registry. 7. Start your Microsoft Visual Basic 6.0 . 8. Open Add-Ins Manager.    9. Select " MouseWheelFix " in the av...

Make an application on top of another window in VB6

Maintaining an application on top of other applications, regardless if they were present on the screen or are called later is. VB6: Maintaining an application over the others     * In a general module     * In the opening form     * Calling the function     * Removing priority Copy and paste this in a General Module. Public Declare Function SetWindowPos Lib "user32" (ByVal hwnd As Long, ByVal_     hWndInsertAfter As Long, ByVal x As Long, ByVal y As Long, ByVal cx As _     Long, ByVal cy As Long, ByVal wFlags As Long) As Long Public Const HWND_TOPMOST = -1 Public Const HWND_NOTOPMOST = -2 Public Const SWP_NOACTIVATE = &H10 Public Const SWP_SHOWWINDOW = &H40 Public Const SWP_NOMOVE = 2 Public Const SWP_NOSIZE = 1 Put this in your form. Private Sub Form_Load()     Dim R as long     R = SetWindowPos(SheetName.hwnd, HWND_TOPMOST, 0, 0, 0, 0, SWP_...

Compact a JET database using ADO in VB6

The following routines demonstrates how to compact a JET database using ADO: Option Explicit 'Purpose : Compact a JET (Access) database using ADO 'Inputs : sDatabasePath The path to the database path eg. C:\nwind.mdb ' [bEncryptDatabase] If True, encrypts the contents of the database 'Outputs : Returns zero if successful, else returns error code 'Notes : Requires "Microsoft Jet and Replication Objects X.X library", ' where (X.X is greater than or equal to 2.1) ' Compacts the database by creating a temporary database with the extension .tmp then, ' if the compaction is successful, it overwrites the original database. ' Will not work if anyone else is connected to the database. 'Revisions : 'Assumptions : Function DatabaseCompact(sDatabasePath As String, Optional bEncryptDatabase As Boolean = False) As Long...

Open an External File, URL, Email and System Apps in VB6

The ShellExecute function allows you to open external application, specific URL location, email address or launch system applications upon clicking on a single button. 1. Start a new Standard Exe Project. 2. Add this code in General Declarations . Private Declare Function ShellExecute Lib "shell32.dll" Alias "ShellExecuteA" (ByVal hwnd As Long, & _ ByVal lpOperation As String, & _ ByVal lpFile As String, & _ ByVal lpParameters As String, & _ ByVal lpDirectory As String, & _ ByVal nShowCmd As Long) As Long 3. Add a command button on your form, change its name to cmdOpen. 4. DoubleClick on the form and try any of the codes below. '# Open file (quotes are used so that the actual value that is passed is "C:\test.txt" Private Sub cmdOpen_Click()     ShellExecute 0, vbNullString, """"C:\test.txt"""", vbNullString, vbNullString, vbNormalFocus End Su...

Auto-adjust Column Width of a Listview Control in VB6

The following function auto adjusts column width of listview controls in vb6. Just copy and paste the code below on your project and call the function after loading data on your listview control. Private Declare Function SendMessage Lib "user32" Alias "SendMessageA" (ByVal hwnd As Long, ByVal wMsg As Long, ByVal wParam As Long, lParam As Any) As Long Private Sub AutosizeColumns(ByVal TargetListView As ListView) Const SET_COLUMN_WIDTH As Long = 4126 Const AUTOSIZE_USEHEADER As Long = -2 Dim lngColumn As Long For lngColumn = 0 To (TargetListView.ColumnHeaders.Count - 1) Call SendMessage(TargetListView.hwnd, SET_COLUMN_WIDTH, lngColumn, ByVal AUTOSIZE_USEHEADER) Next lngColumn End Sub

VB KeyAscii Code and Values

Visual Basic KeyAscii Values can range from 0 to 255.  Here is a chart which shows all possible KeyAscii values along with the character which they represent.To type out any of these characters without pressing the actual character you can do this.Hold down the left ALT key on your keyboard and using the number pad on the right of your keyboard type in the corresponding ASCII value.For instance, typing ALT+66 will yield B . For numbers above 127 use "0 + the number". For instance to find the character which corresponds to KeyAscii value 134 you would type ALT+0134 which yields † . Note: KeyAscii values 0 to 31 are non-printable and values 128-255 are considered "Extended". These "extended" codes may vary in appearance from computer to computer, font to font and may not be displayed, so please use with caution. ASCII CHAR ASCII CHAR 0 NUL (null) / Ctrl+Shift+@ 128 € 1 SOH (start of heading) / ☺ / Ctrl+A 129  ...

Customized Progress Bar in VB6 using Image Control

Image
In order to implement a progress bar in VB6 you need to enable the component " Microsoft Windows Common Controls #.# " before you can add this control on your form. In this example, you won't need any extra Controls that will require another libraries when running the app on another system. What you will need is a standard Label, Image, Timer controls and the Sleep API declaration to implement a smooth progress of the Progress Bar. CODE: Option Explicit ' ################################################################# ' # By: Cromwell Bayon (omelsoft@gmail.com) ' # Description: Progress Bar Using Custom Image ' # Date: Friday 12th of April, 2013 ' ################################################################# ' DECLARE PROGRESS BAR VARIABLES Public iMax As Long, _ iMin As Long, _ u_Val As Long, _ xMinVal As Long, _ xMaxVal As Long, _ xPBar As Long Priv...

Borderless Form with Customized Tabs and Frame in VB6

Image
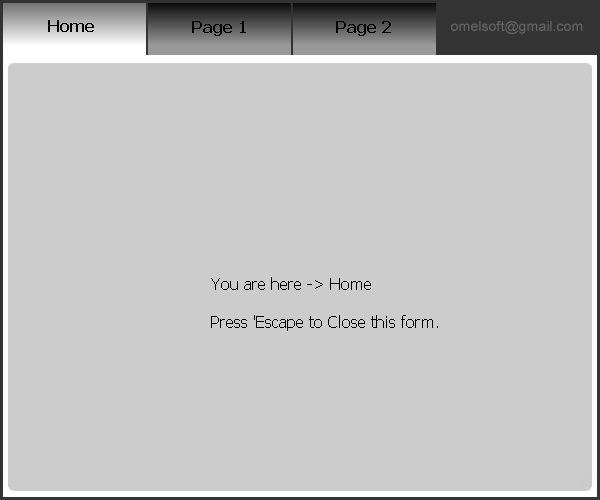
This is a simple example on how to create a border-less window in VB6 with using P icture B ox and I mage controls. A quick guide on how to create the form. 1.) Start a New Project-> Standard EXE 2.) Click on the form and Press “F4″ to show the Properties Window.       Then set the following properties.       Borderstyle – 0 - None (Hides the border)       ControlBox – False - (Hides the Max/Min/Close buttons) 3.) Add (1) PictureBox, the same size with form. This will serve as main form. 4.) Add another (1) PictureBox, but now it should be inside the first PictureBox. This will serve as our content view. 5.) Add (3) Image Controls, that will be the tabs or buttons. 6.) You may create your own pictures based on your styles. I used Fireworks to design the form. Anyway, the pictures is included the sample program . It may just be as simple as you want but you may also create your own style to fit your ne...