Posts

Showing posts from 2013

Implement a Graph from ASCII Data to Chart Windows Form Control using VB.NET

Image
The example below is a simple way on how to Plot a Graph in Chart Windows Form Control using VB.Net. Requirements: 1. Microsoft Visual Studio (In my case, I'm using Visual Studio 2010 Express Edition). To Begin with: 1. Start your Microsoft Visual Basic 2010 Express. 2. In the New Project window, Choose " Windows Form Application " and name it to whatever you like or something like " Plot Graph " then Click " OK ". 3. You must now be able to see the Form. On the toolbox Add the following controls onto the form and update its properties.      a. Form : Name := frmGraph      b. (1) Chart : Name := Chart1      c. (1) Textbox : Name := txtData , Multiline:= True , Text := 30;52;57;57;68;93;129;173;209;232;240;232;217;196;169;141;116;98;86;80;78;76;76;79;81;83;86;91;95;97;95;93;95;99;103;105;106;107;110;116;120;122;123;124;127;132;137;139;137;136;132;126;124;122;117;113;110;105;97      d. (1) Button : Name := btnPlot , Text := &Plot

How to Enable and Disable Macros in Microsoft Excel

Image
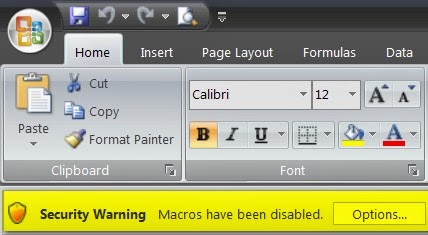
While most macros are harmless and helpful when it comes to automating repetitive tasks. It also poses a security risks if it's coded with malicious purpose. It can contain unsafe codes that can be harmful when ran on your systems.  Do make sure that you run macros that you own or from known sources and trusted publishers.  To enable or disable and set macro security level in any office application that has VBA macros, Open the Developer tab or See How to show Developer tab in Ribbon . Open up the Trust Center dialog window by clicking the macro security button on the developer tab or press ( Alt+LAS ) on your keyboard. The Macro settings tab on trust center dialog window has additional option buttons you can select to change macro level security. Disable all macros without notification - Select this option when you don't want to run all macros from unknown sources and untrusted publisher's location. D isable all macros with not

How to show the Developer Tab in Microsoft Excel 2007

Image
By default, the Developer Tab is not shown on the Microsoft Excel's Ribbon. In order to show the Developer tab, Go to the File Menu and Click the Excel Options button.   On the Excel Options Window, Check the box Show Developer tab in the Ribbon .   Then Click OK, and that should show up the Developer tab.

The Ultimate Annual-Monthly Microsoft Excel Calendar template

Image
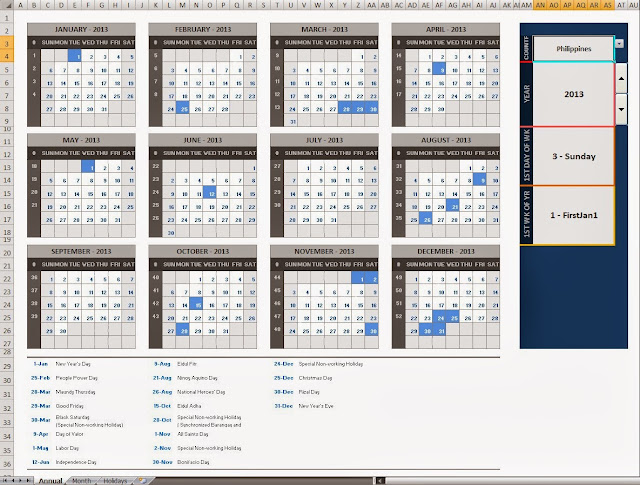
This Ultimate Excel Calendar Template allows user, company or any organization to create their own calendars. The template was created in VBA and may require the user to enable macro content in the document. Annual Calendar Template: Country - Choose your home country. Year - Calendar year First Day of the Week - The first day of the week to be displayed First Week of The Year - Determines the work week number The screenshot below shows the calendar of the whole year and the holidays. The video shows how does Ultimate Excel Calendar template work. Monthly Calendar Template: Month - Choose which Month you want to display. Year - Month year. First Day of Week -  First day of the week to be displayed. Country - Choose your location This template will display the Holiday of the Month in the respective dates. Download the Ultimate Annual-Monthly Excel Calendar or post your email in the comment so I can send to you the template file.

Using Nested IFError - IF - VLookUp Functions in Excel

Image
In this example we'll be using three excel functions such as IFERROR , IF and VLOOKUP functions.  =IFERROR(IF(G3="","",VLOOKUP(G3,Sheet1!B:C,2,FALSE)), "No Match Found") For this example, we'll use the above formula at Cell "G4" : Initially, the formula says that if the value of G3 is blank then set the value of G4 to blank. Otherwise, look for the lookup value ( ID )  in the table array and return the exact match in the second column ( Name ) . If the value is not found in the array then return a message to the user.   IFERROR( 'Formula to Evaluate', value-if-error ) - Returns the specified value "No Match Found" if the formula evaluated returns an error value.   IF( logical_test, [value_if_true], [value_if_false] ) - Logic test is a comparison between two values ( G3="" ), test's if the value of G3 is empty. Followed by two arguments which are the value_if_true and v

Always Show Selected Row of a DataGridView in C# / CSharp

The following codes will always Show the Selected Row of a DatagridView when the data is reloaded and will recall the state of the scrollbar by its scroll value.. CODE: private int scrollVal = 0, rowIndex = 0, lastRow = 0; private void datagridView1_Scroll(object sender, EventArgs e)     {         //WILL USE THE SCROLL VALUE LATER WHEN RELOADING THE DATAGRIDVIEW         scrollVal = datagridView1.VerticalScrollingOffset;     } private void datagridView1_CellClick(object sender, DataGridViewCellEventArgs e)     {         //GETS THE INDEX OF THE CURRENT SELECTED ROW         rowIndex = this.datagridView1.CurrentRow.Index;         rowIndex = rowIndex != 0 ? lastRow = rowIndex : lastRow = rowIndex;     } private void reloadDatagridView()     {         //RELOADS DATA OF THE DATAGRIDVIEW         datagridView1.Clear();         datagridView1.DataSource = "Your Data Table";         datagridView1.AutoGenerateColumns = true;         datagridView1.MultiSelect = false;         datag

Display Unique Number Values in a string using PHP

The funciton DisplayUniqueValues() will let you remove the duplicate values from a string array of numbers and sort out the resulting value that will be displayed. Code: <?php function DisplayUniqueValues($NumArray) { //Remove the duplicated values $uniques = array_unique(explode(",", $NumArray)); //Sort out the unique values $result = sort($uniques, SORT_NUMERIC); //Combine the result in a string using the separator ',' $result = implode(',', $uniques); return $result; } //USAGE $str_num = '12,13,14,12,12,12,12,11,14,90,78,78,91,90,92,89'; echo DisplayUniqueValues($str_num); ?> Output should be: 11,12,13,14,78,89,90,91,92

Password Generator Function in PHP

The following GeneratePassword() function lets you to create a random password whether for your custom site or for personal use. The function contains 1 parameter which is $len . $len - The number of password characters. You can also define the set of characters "CHARS" on your parent class. Code: <?php define("CHARS", "abcdefghijklmnopqrstuvwxyzABCDEFGHIJKLMNOPQRSTUVWXYZ0123456789-_+@(!)<>"); function GeneratePassword($len = 10) {     $pass = ''; //Initialize random password variable     $char = str_split(CHARS);     $count = strlen(CHARS) - 1;     for ($i = 0; $i < $len; ++$i)     {         $index = rand(1, $count);         $pass .= $char[$index];     }         return $pass; } ?> Usage: <?php       echo GeneratePassword(12); ?>  Output: LnxLLo+pGHiD  

Adding Menu's, Sub-Menus and Menu Separator at Design Time in Visual Basic 6

Image
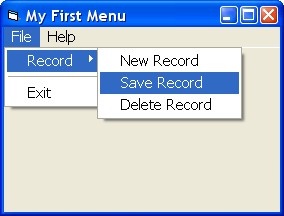
This is a quick guide for beginners on how to add Menu, Sub-Menu and Menu Separator at Design Time in VB6 Project. To do this, Open up your Microsoft Visual Basic and start a New Standard EXE Project that will automatically create a form named Form1. Just follow the steps below or download the example here . 1.) First, right click on form then choose Menu Editor or Press Ctrl+E . 2.) On the Menu Editor, add a Main Menu Caption like "File" and give it a name like "nFile" then click Next. 3.) Click the right arrow button to add a menu under the main menu "File". 4.) Now create the First Level Menu and give it a Caption like "Record" and a name like "mRecord". 5.) Now to create a Sub-Menu for the menu Record, click the next button and the arrow button. As you can see in the list below that it is nested. Note: You can use the arrows to move your menus up, down, left or right. 6.) Now to create the Menu Separator , j

How to Move a Border-less Form or Control in VB6/Visual Basic 6

Image
The following codes allows you to drag or move a border-less Form or Control in Visual Basic 6. This also works on other controls like Label , Image or Picture Box . You can also move or drag a control inside a form. Copy and Paste the code below in a Standard Module. Declare Function SendMessage Lib "user32" Alias "SendMessageA" (ByVal hWnd As Long, ByVal wMsg As Long, ByVal wParam As Long, lParam As Any) As Long Declare Sub ReleaseCapture Lib "user32" () Public Const WM_NCLBUTTONDOWN = &HA1 Public Const HTCAPTION = 2 Then Copy and Paste the code below on a Form or Controls MouseDown Event. Private Sub Form_MouseDown(Button As Integer, Shift As Integer, x As Single, y As Single) Dim ReturnValue As Long If Button = 1 Then Call ReleaseCapture ReturnValue = SendMessage(Me.hWnd, WM_NCLBUTTONDOWN, HTCAPTION, 0&) End If End Sub You should be able to move the form by holding the mouse button

Prevent Autorun.inf Virus from running in your Computer

Image
Autorun.inf is mostly used by hackers to run and spread malicious software or malwares and viruses in computers. Most people especially those who are not so familiar with this type of file are victimized. In my own experience when I was surfing the net in an Internet Cafe and plugged in my USB Drive to the PC I was using. I was there to do some research and surfing other stuffs without any problem. Later on when I went home and plugged in my USB Drive into my PC I've noticed that all folder's and documents on my USB were all gone but found out that those was just hidden. And when I was able to retrieve back all files and documents I've noticed this " Autorun.inf " folder in my USB. I tried to delete the folder but failed because it's having a read-only attribute. So here's what I did: 1.) Open " Run ", type in " cmd ". To open the command prompt window. 2.) In the Command Prompt window, type in the Drive letter of the USB rem

Tricks on how to set an image background of folders in Windows XP/Vista/7

Image
Have you ever wanted to customize the background of any folders in Windows XP/Vista/7? This trick will allow you to add a custom image background on your personal folders. 1.) Choose the folder you want to customize. 2.) Save the image you want to set as background in the folder. Or you may also use the image file in a specific location. 3.) Open "Notepad" and paste the code below then save as "desktop.ini" inside the folder.     [{BE098140-A513-11D0-A3A4-00C04FD706EC}]     iconarea_image=Mustang-Monster-HD-Wallpapers.jpg     iconarea_text=3407871 *Note: Make sure you type the exact location of the image file. If you save the image inside the folder then just type the filename and the exact image extension. 4.) Open " Run " and type " cmd ". 5.) Now, we're gonna set the system file attribute of the folder we want to customize.     On the command prompt window, type attrib +s "< folder address >

Excel VLOOKUP Function Tutorial

Image
The following example will give you an idea on how to use VLOOKUP in Microsoft Excel. If you're working with an excel database and want it to be dynamic the VLOOKUP/HLOOKUP functions are very useful for you. The VLOOKUP function looks up value in columns while HLOOKUP does in rows.  This example has two sheets "Price_List" and "Orders" for mobile brands. *Note: The values given are not the actual market prices. The "Price_List" sheet has three columns ID, Model and Price. This is where we'll be looking up the prices value for every orders made. Now, on the orders tab we have 3 orders made. We'll add the VLOOKUP function in the Total Price formula. This formula "=VLOOKUP(B2,Price_List!B1:C7,2,FALSE)" will LOOKUP for the price of the unit brand in the Price_List Sheet. =IF(C2<>"",VLOOKUP(B2,Price_List!B1:C7,2,FALSE) *C2,VLOOKUP(B2,Price_List!B1:C7,2,FALSE)) The formula above is a  logical cond

Keyascii Code Generator in VB6

Image
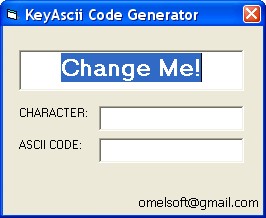
This application allows you get the equivalent KeyAscii Value for every key you'll press on your keyboard. Just click on the "Change Me!" and start pressing any key on your keyboard. The Character Box will display the key you just pressed. And the ASCII Code box will display the keyascii value of the key you pressed. Download the KeyAscii Code Generator sample program.

How to enable Mouse Wheel Scrolling in VB6

Image
This article will guide you through on how to enable Mouse Wheel Scrolling in VB6 . 1. You need to download the Microsoft's VB6 Mouse Wheel Addin . 2. Run the Self-Cabinet Extractor and Unzip the necessary files.    You may change the destination to accessible location "C:\vb6mwfix". 3. Open " Run ", copy and paste this code " xcopy C:\vb6mwfix\VB6IDEMouseWheelAddin.dll %windir%\system32\VB6IDEMouseWheelAddin.dll " without " qoutes ". 4. Press " F " to confirm the destination as file. 5. Open " Run ", copy and paste this code " regsvr32 %windir%\system32\VB6IDEMouseWheelAddin.dll " without " qoutes " to register the add-in. 6. Open the "VBA Mouse Wheel Fix.reg " located on the folder where you extract the files to add the addin information in the registry. 7. Start your Microsoft Visual Basic 6.0 . 8. Open Add-Ins Manager.    9. Select " MouseWheelFix " in the av

Make an application on top of another window in VB6

Maintaining an application on top of other applications, regardless if they were present on the screen or are called later is. VB6: Maintaining an application over the others     * In a general module     * In the opening form     * Calling the function     * Removing priority Copy and paste this in a General Module. Public Declare Function SetWindowPos Lib "user32" (ByVal hwnd As Long, ByVal_     hWndInsertAfter As Long, ByVal x As Long, ByVal y As Long, ByVal cx As _     Long, ByVal cy As Long, ByVal wFlags As Long) As Long Public Const HWND_TOPMOST = -1 Public Const HWND_NOTOPMOST = -2 Public Const SWP_NOACTIVATE = &H10 Public Const SWP_SHOWWINDOW = &H40 Public Const SWP_NOMOVE = 2 Public Const SWP_NOSIZE = 1 Put this in your form. Private Sub Form_Load()     Dim R as long     R = SetWindowPos(SheetName.hwnd, HWND_TOPMOST, 0, 0, 0, 0, SWP_NOMOVE Or SWP_NOSIZE) End sub Calling the function The function must be put in the activation of the form

Compact a JET database using ADO in VB6

The following routines demonstrates how to compact a JET database using ADO: Option Explicit 'Purpose : Compact a JET (Access) database using ADO 'Inputs : sDatabasePath The path to the database path eg. C:\nwind.mdb ' [bEncryptDatabase] If True, encrypts the contents of the database 'Outputs : Returns zero if successful, else returns error code 'Notes : Requires "Microsoft Jet and Replication Objects X.X library", ' where (X.X is greater than or equal to 2.1) ' Compacts the database by creating a temporary database with the extension .tmp then, ' if the compaction is successful, it overwrites the original database. ' Will not work if anyone else is connected to the database. 'Revisions : 'Assumptions : Function DatabaseCompact(sDatabasePath As String, Optional bEncryptDatabase As Boolean = False) As Long

Open an External File, URL, Email and System Apps in VB6

The ShellExecute function allows you to open external application, specific URL location, email address or launch system applications upon clicking on a single button. 1. Start a new Standard Exe Project. 2. Add this code in General Declarations . Private Declare Function ShellExecute Lib "shell32.dll" Alias "ShellExecuteA" (ByVal hwnd As Long, & _ ByVal lpOperation As String, & _ ByVal lpFile As String, & _ ByVal lpParameters As String, & _ ByVal lpDirectory As String, & _ ByVal nShowCmd As Long) As Long 3. Add a command button on your form, change its name to cmdOpen. 4. DoubleClick on the form and try any of the codes below. '# Open file (quotes are used so that the actual value that is passed is "C:\test.txt" Private Sub cmdOpen_Click()     ShellExecute 0, vbNullString, """"C:\test.txt"""", vbNullString, vbNullString, vbNormalFocus End Su

Auto-adjust Column Width of a Listview Control in VB6

The following function auto adjusts column width of listview controls in vb6. Just copy and paste the code below on your project and call the function after loading data on your listview control. Private Declare Function SendMessage Lib "user32" Alias "SendMessageA" (ByVal hwnd As Long, ByVal wMsg As Long, ByVal wParam As Long, lParam As Any) As Long Private Sub AutosizeColumns(ByVal TargetListView As ListView) Const SET_COLUMN_WIDTH As Long = 4126 Const AUTOSIZE_USEHEADER As Long = -2 Dim lngColumn As Long For lngColumn = 0 To (TargetListView.ColumnHeaders.Count - 1) Call SendMessage(TargetListView.hwnd, SET_COLUMN_WIDTH, lngColumn, ByVal AUTOSIZE_USEHEADER) Next lngColumn End Sub

VB KeyAscii Code and Values

Visual Basic KeyAscii Values can range from 0 to 255.  Here is a chart which shows all possible KeyAscii values along with the character which they represent.To type out any of these characters without pressing the actual character you can do this.Hold down the left ALT key on your keyboard and using the number pad on the right of your keyboard type in the corresponding ASCII value.For instance, typing ALT+66 will yield B . For numbers above 127 use "0 + the number". For instance to find the character which corresponds to KeyAscii value 134 you would type ALT+0134 which yields † . Note: KeyAscii values 0 to 31 are non-printable and values 128-255 are considered "Extended". These "extended" codes may vary in appearance from computer to computer, font to font and may not be displayed, so please use with caution. ASCII CHAR ASCII CHAR 0 NUL (null) / Ctrl+Shift+@ 128 € 1 SOH (start of heading) / ☺ / Ctrl+A 129 

Customized Progress Bar in VB6 using Image Control

Image
In order to implement a progress bar in VB6 you need to enable the component " Microsoft Windows Common Controls #.# " before you can add this control on your form. In this example, you won't need any extra Controls that will require another libraries when running the app on another system. What you will need is a standard Label, Image, Timer controls and the Sleep API declaration to implement a smooth progress of the Progress Bar. CODE: Option Explicit ' ################################################################# ' # By: Cromwell Bayon (omelsoft@gmail.com) ' # Description: Progress Bar Using Custom Image ' # Date: Friday 12th of April, 2013 ' ################################################################# ' DECLARE PROGRESS BAR VARIABLES Public iMax As Long, _ iMin As Long, _ u_Val As Long, _ xMinVal As Long, _ xMaxVal As Long, _ xPBar As Long Priv