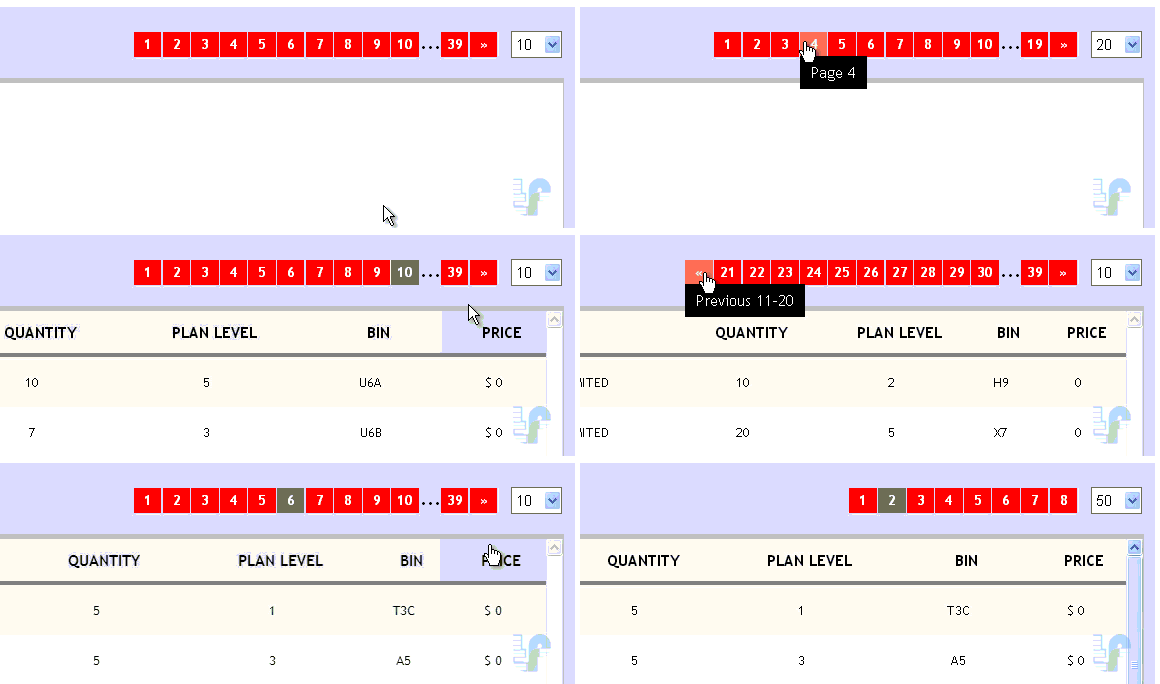
Create Pagination Using jQuery-PHP-Ajax on a Webpage

In this tutorial, I'll be showing you a basic example on how to create Pagination on your website. The purpose of this is just to give basic logic of how it was created. So, let's get it started.
First, we will create the PHP file to print out the page ranges. We have two parameters $LIMIT and $RANGE that is passed by an Ajax request via jQuery.
$LIMIT - This is the limit of rows per page to be displayed.
$RANGE - Initially, this is set to 1. This is the pages range that will be displayed. It will decrement/increment as you click the Next or Previous buttons.
Additional parameters...
$MAX - The maximum number of pages to be shown in a range. This example shows 10.
$RECORDS - Get the total number of records in the database table.
$PAGES - This is the quotient of the $RECORDS divided by the $LIMIT.
Then we do some conditional statement to print out the pages, next and prev button.
PHP File (pages.php)
<?php
include "js/pagination.js";
require_once("includes/functions.php");
# Declare variable of the class
$PI = new PartsInventory;
# Get parameter values passed by the jQuery-Ajax script
$_GET['limit'] == "" ? $LIMIT = 10 : $LIMIT = $_GET['limit'];
$RANGE = $_GET['page'];
# Get the Total Number of Records
$RECORDS = $PI->InventoryCount();
# Calculate the number of pages
$PAGES = number_format($RECORDS / $LIMIT);
# This will be the range of pages to be displayed
# e.g. 1 2 3 4 5 6 7 8 9 10 ... 20 >
$MAX = 10;
# Now, create the list of page ranges, the total number of pages, prev or next.
echo '<ul>';
if ( $RANGE > 1) {
echo '<li id="prev" val="'. ($RANGE - 1) .'" alt="Previous '. ((($MAX * $RANGE) - ($MAX * 2) + 1)) .'-'. ($MAX * $RANGE - $MAX) .'">«</li>';
}
for ($RANGE == 1 ? $i = 1 : $i = $MAX * $RANGE - $MAX + 1 ; $PAGES < $MAX * $RANGE ? $i <= $PAGES : $i <= $RANGE * $MAX ; $i++) {
echo '<li id="page_'. $i .'" alt="Page '. $i .'">' .$i. '</li>';
}
if ($PAGES > $i ){
echo '...';
echo '<li id="page_'. $PAGES .'" alt="Page '. $PAGES .'">' . $PAGES . '</li>';
echo '<li id="next" val="'. $RANGE .'" alt="Next '. ($MAX * $RANGE + 1) .'-'. ($MAX * $RANGE + $MAX) .'">»</li>';
}
echo '</ul>';
?>
The html markup where we will print the list of pages returned by the Ajax Request.
HTML Markup:
<div id="pagination">
    <select id="limit">
        <option value="10">10
        <option value="20">20
        <option value="30">30
        <option value="40">40
        <option value="50">50
        <option value="60">60
        <option value="70">70
        <option value="80">80
        <option value="90">90
        <option value="100">100
    </select>
    <div id="pages">
    <!--PRINT PAGES HERE-->
    </div>
</div>
Now, let's add some style to the pagination control's list of pages.
Stylesheet (pagination.css)
#pagination select {
 float: right;
 padding: 3px 0 3px 0;
 border: 1px solid #666;
}

div#pagination {
 float: right;
 display: inline-block;
 width: auto;
 padding: 10px 0 10px 0;
}

#pagination ul {
 position:absolute;
 right: 60px;
 list-style: none;
 top: -4px;
}
#pagination ul li {
 display: inline-block;
 background: red;
 color: #FFF;
 font-size: 12px;
 font-weight: bold;
 margin-right: 1px;
 width: 25px;
 padding: 3px 0 3px 0;
 text-align: center;
 cursor: pointer;
}
#pagination ul li:hover {
 opacity: 0.5;
}
This is the Javascript file that handle all jQuery events and Ajax Request on our pagination control.Javascript File (pagination.js)
$(document).ready(function() {
var pages = $.ajax({
type: "GET",
url: "pages.php?limit=10&range=1",
async: false}).responseText;</pre>
$('#pages').html(pages);
$('.loading').fadeOut("slow");
});
var pi = $.PartsInventory;
$("#pagination ul li").not("#next, #prev").click(function() {
var limit = $("#limit").val();
var range = $(this).text();
var results= $.ajax({type: "GET",
url: "inventory.php?limit=" + limit + "&range=" + range,
async: false}).responseText;
$('#results').html(results).css("overflow-y", "scroll");
$('#myTable').fadeIn(800).tablesorter();
$("#pagination ul li").css("background", "red");
$(this).css("background", "#666");
});
$("#pagination ul li, #next, #prev").hover(function() {
pi.showTip($(this).offset(), $(this).outerHeight(), $(this).attr('alt'));
}, function() {
pi.hideTip();
});
$("#next").click(function() {
var limit = parseInt($("#limit").val());
var curVal = parseInt($(this).attr("val"));
var range = curVal + 1;
$(this).attr("val", range);
var pages = $.ajax({
type: "GET",
url: "pages.php?limit="+ limit +"&range="+ range,
async: false}).responseText;
$('#pages').html(pages);
});
$("#prev").click(function() {
var limit = parseInt($("#limit").val());
var curVal = parseInt($(this).attr("val"));
var range = curVal;
$(this).attr("val", range);
var pages = $.ajax({
type: "GET",
url: "pages.php?limit="+ limit +"&range="+ range,
async: false}).responseText;
$('#pages').html(pages);
});
$("#limit").change(function(event){
if (event.handled !== true)
{
var pages = $.ajax({
type: "GET",
url: "pages.php?limit="+ $(this).val() + "&range=1",
async: false}).responseText;
$('#pages').html(pages);
$('.loading').fadeOut("slow");
event.handled = true;
}
});
Preview:


nice post
ReplyDeletesee more